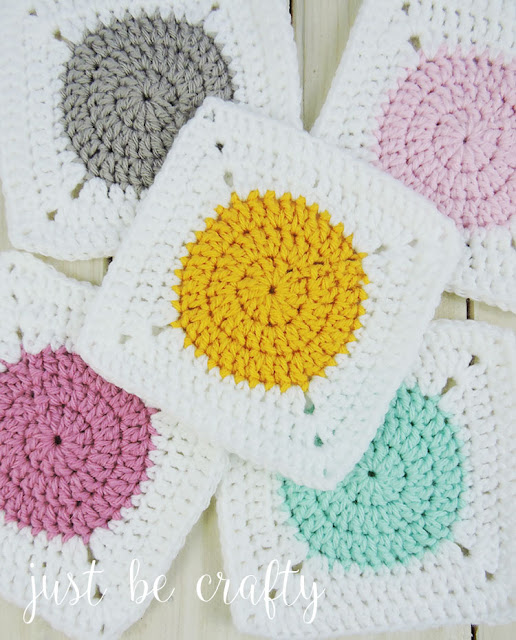
Crochet Squares or Granny Squares are so beautiful and easy to make. You can do so many things with crochet squares. You can make a blanket, a dress, a top, curtains, so on and so forth...
Here are some of the gorgeous squares I found on the net, most of them on Pinterest. Pinterest offers a variety of Free Crochet Patterns.You can search more on crochet squares on Pinterest if you want more of these.
Some of the patterns here offers picture tutorial for your convenience and others are just written patterns and some also are in a graph. Hopefully, you can read graphs for I myself have difficulty reading Crochet Graphs.
The Daisy Square by Tillie Tulip - The link is on how to add the border of the daisy, but as you read the post you can find also the link on how to make the center daisy.
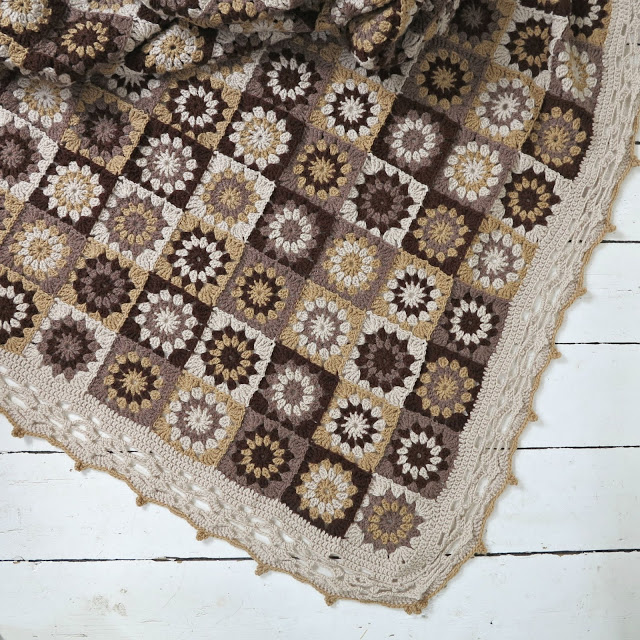
Coffee-Chocolate Square by My Way-Hobby. I really don't know what this square is called. The title is Coffee-Chocolate after I click translate on Chrome. It's not in English and the pattern is in a graph. But the graph is easy to understand. So I guess it's called Coffee-Chocolate.
Hope you will try to make any of this beautiful squares and don'tforget to Tag me onInstagram and Twitterand also like my Page on Facebook, Si Nanay Madel. I would love to see what you've done and Pin it also on Pinterest.
All Pictures in this post is not mine. Credit all to the wonderful and creative designers above.
So that's it. I hope you all learn something and enjoy this post. If you have any questions, comments or suggestion just leave a message in the comment box and I will gladly answer them. Thank you and God bless!
xoxo
Nanay Madel
Don't forget to share on Facebook, Pinterest, Twitter and more.
**Please do not copy and post any pattern from this blog and claim it as your own. This pattern is limited to personal use only. Please do not re-publish all photos from this blog as your own. You may make and sell products from my pattern. Please also link back to my post. Any link back will be much, much appreciated. Thank you very much. **
I always make sure to share also because I learn to crochet for free from some very generous bloggers
Thought of the Day
August 30, 2017
Whether believers or unbelievers, all men are the Lord's property. All are called to do service for Him. - COL 326
It's a simple scarf that can be worn anytime with any type of clothing. It's easy and fast to make. If you are a fast crocheter you can finish this scarf for an hour.
Materials
Caron Cakes in Blueberry Cheesecake
I/5.5mm Crochet Hook
Tapestry Needle
Scissors
Terms Used
ST(s) - Stitch(es)
CH(s) - Chain(s)
DC - Double Crochet
SL ST - Slip Stitch
Instructions
Foundation Chain= 25CHs
Row 1. Add CH 4 in your foundation CH, DC in the 4th CH from the hook. The First 3 CHS are counted as a ST. 1 DC in each of the next 2 STs. *CH 1, Skip a ST, 1 DC in each of the next 3 STS* Repeat till end. Turn. (6 granny squares)
Row 2. CH4, 3 DC in the first CH 1 space. * CH 1, 3 DC in CH 1 space* Repeat till the last CH 1 space. Then CH 1 and DC on top of CH3 of the previous round. Turn. (5 granny squares)
Row 3. CH 2, 2 DC in CH 1 space. * CH 1, 3 DC in CH 1 space* Repeat till the last CH 1 space, then 3 DC in the beg CH 4 of the Previous round. Turn. ( 6 Granny Squares)
Repeat R2 and R3 respectively until R105.
Break yarn and fasten off. Weave in all ends.
It's simple and easy to make. But would make a great addition to your wardrobe.
Hope you also enjoy making this project and don'tforget to Tag me onInstagram and Twitterwith your finished project and also like my Page in Facebook, Si Nanay Madel. I would love to see what you've done and Pin it also on Pinterest.
So that's it. I hope you all learn something and enjoy this post. If you have any questions, comments or suggestion just leave a message in the comment box and I will gladly answer them. Thank you and God bless!
xoxo
Nanay Madel
Don't forget to share on Facebook, Pinterest, Twitter and more.
**Please do not copy and post any pattern from this blog and claim it as your own. This pattern is limited to personal use only. Please do not re-publish all photos from this blog as your own. You may make and sell products from my pattern. Please also link back to my post. Any link back will be much, much appreciated. Thank you very much. **
I always make sure to share also because I learn to crochet for free from some very generous bloggers
Thought of the Day
August 28, 2017
But as many as received him, to them gave he power to become the sons of God, even to them that believe on his name. - John 1:12
There is a ready to download in PDF form of this pattern on my Ravelry. Free of advertisements, ready for download and print. You just have to pay a very minimal amount for it. Here is the link.
The colors of Christmas! But this Pattern has nothing to do with Christmas. It just so happens that I love the color Red and Christmas is approaching.
This bag can be worn by a little girl and also for grown-ups. You just need to adjust the straps/slings.
Materials:
RH with Love in Holly Berry & Eggshell
H8/5.00 mm crochet hook
J10/6.00 mm crochet hook
Eyelets with washers (optional)
Scissors
Tapestry Needle
Terms Used:
st(s) - stitch(es)
ch(s) - chain(s)
sl st - slip stitch
sc - single crochet
dc - double crochet
Long DC - Long Double Crochet. Yarn over, insert hook in indicated stitch. Yarn over again, PULL UP A LOOP UP TO AN INCH to make it a Long DC. Yarn over, as usual, pull through two yarns, yarn over again and pull through all remaining yarn.
Instructions
In making the bottom of my bags I always make 2 bottoms and join them together for a sturdier bottoms.
Make 2 Bottoms
R1. With your H hook and the Holly Berry yarn, make a magic Ring. CH 1 and 6 SC into the ring. Join with a SL ST in first SC and close the ring tightly. (6 SC)
R2. CH 1, 2 SC in each ST around. Join with a SL ST in first SC. (12 SC)
R3. CH 1, 1 SC in first ST, 2 SC in next. Repeat till end. Join with a SL ST in first SC. (18 SC)
R4. CH 1, 1 SC in first 2 STS, 2 SC in next. Repeat till end. Join with a SL ST in first SC. (24 SC)
R5. CH 1, 1 SC in first 3 STS, 2 SC in next. Repeat till end. Join with a SL ST in first SC. (30 SC)
R6. CH 1, 1 SC in first 4 STS, 2 SC in next. Repeat till end. Join with a SL ST in first SC. (36 SC)
R7. CH 1, 1 SC in first 5 STS, 2 SC in next. Repeat till end. Join with a SL ST in first SC. (42 SC)
R8. CH 1, 1 SC in first 6 STS, 2 SC in next. Repeat till end. Join with a SL ST in first SC. (48 SC)
R9. CH 1, 1 SC in first 7 STS, 2 SC in next. Repeat till end. Join with a SL ST in first SC. (54 SC)
R10. CH 1, 1 SC in first 8 STS, 2 SC in next. Repeat till end. Join with a SL ST in first SC. (60 SC)
R11. CH 1, 1 SC in first 9 STS, 2 SC in next. Repeat till end. Join with a SL ST in first SC. (66 SC)
R12. CH 1, 1 SC in first 10 STS, 2 SC in next. Repeat till end. Join with a SL ST in first SC. (72 SC)
R13. CH 1, 1 SC in first 11 STS, 2 SC in next. Repeat till end. Join with a SL ST in first SC. (78 SC)
R14. CH 1, 1 SC in first 12 STS, 2 SC in next. Repeat till end. Join with a SL ST in first SC. (84 SC)
R15. CH 1, 1 SC in first 13 STS, 2 SC in next. Repeat till end. Join with a SL ST in first SC. (90 SC)
R16. CH 1, 1 SC in first 14 STS, 2 SC in next. Repeat till end. Join with a SL ST in first SC. (96 SC)
R17. CH 1, 1 SC in first 15 STS, 2 SC in next. Repeat till end. Join with a SL ST in first SC. (102 SC)
Fasten off and weave ends with the first circle. But in the second, do not fasten off we will continue to work with our bottoms by joining the two circle you just made. Remember wrong sides facing each other. Then SC both circles together and this will be R18.
R18. CH 1, SC in first ST and in all the stitches around. Join with a SL ST in first SC. (102 SC)
Change your hook. Use the J hook this time. I like to use a bigger hook for the body of this bag so that my stitches will be emphasized.
R19. CH 1, SC in first ST, DC in same ST. *Skip a ST, SC & DC in next ST* Repeat till end. Join with a SL ST in first SC ( 102 STS)
R20. CH 1, SC in first ST, DC in same ST. *Skip a ST, SC & DC in next ST* Repeat till end. Change COLOR to Eggshell. Join with a SL ST in first SC ( 102 STS)
R21. CH 1, SC in first ST, DC in same ST. *Skip a ST, SC & DC in next ST* Repeat till end. Join with a SL ST in first SC ( 102 STS)
R22. CH 1, SC in first ST, DC in same ST. *Skip a ST, SC & DC in next ST* Repeat till end. Change color back to Holly Berry. Join with a SL ST in first SC ( 102 STS)
R23- 46. Repeat R 19 to 22.
R47. CH 1, SC in first ST, DC in same ST. *Skip a ST, SC & DC in next ST* Repeat till end. Join with a SL ST in first SC ( 102 STS)
R48. Make room for the eyelets to be placed. In R48, do as R20 but in every 8 stitches you have to make a CH 1 but do not skip any stitches of the previous row. And since all our STS are 102, there will be 3 groups of 10 stitches first before the CH1. You can decide where to make that one, it can be anywhere from the round. Then you will end up with 12 CH1. That means you will attach 12 eyelets for the cord to pass thru. But if you don't have any eyelets, it's just fine. Still, make those CH 1s and let the cord pass thru those CH 1's without the eyelets. Change Color to Eggshell. Join with a SL ST in first SC. ( 102 STS plus 12 CH 1s)
Remember it is better to attach your eyelets at the end when you bag is done and ready for the cords.
R49. CH 1, SC in each STS all the way around, skipping the CH 1s you make in R48. Change back to Holly Berry. Join with a SL ST in first SC. ( 102 SC)
R50. CH1, SC in first ST, *skip 3 STS and make 7 long DC in next ST, skip 3 STS again and SC in next* Repeat till end, but in the last 6 STS, just skip 3 STS to squeeze in the last Shell Stitch with 7 long DC. You will have 13 Shells all in all. Fasten off and weave all ends.
You can attach your eyelets at this point.
Make your strings, using your H J, make it as long as 4 meters long. There are a variety of crocheted cords on the web, especially on Youtube, but in this bag, I follow the one the Boye Crafts posted on their Instagram. Link here.
Small Patches for the cords.
Before starting to make the patches make sure to make at least 6 inches of the tail at the start and also at the end. This tails will be used in attaching the patches to the bag. Use H Hook.
Make 2.
R1. CH 6, SC in the 2nd CH from the hook. CH 1 and turn ( 5 SC)
R2 - R5. SC in each stitch till the end. CH 1 and turn ( 5 SC)
Make 1.
R1. CH 9, SC in the 2nd CH from the hook. CH 1 and turn (8 SC)
R2-R5. SC in each stitch till the end. CH 1 and turn ( 8 SC).
Attach your patches at the back of your bag, like in the picture below.
Flowers
Make 2. Use this as a stopper so that your cords will not be pulled out from the holes. Attached each at the end of the cords AFTER attaching it to your bag,
R1. With your H hook. Make a Magic Ring. CH 1, 6 SC into the ring. Closed the ring tightly and SL ST in first SC.
R2. CH 1, 4 DC in first ST, CH 1, SL ST back in same ST. * SL ST into the next ST, CH 1, 4 DC, CH1 SL ST back into the same ST* Repeat until you will have each 6 STS a petal. Fasten off and weave all ends.
Insert strings into your bag like in the Video Below
Then after the strings are in place attach the flowers at the ends of the cord like in the picture below.
It is good if your strings are long enough because you can easily adjust this bag if the bearer is a little child or a grown up. So make it long enough for adjustments. 4 meters of strings is good enough already.
Now if you want to line your bag you can do so. This bag will be fine also if you decide not to line the bag.
Hope you also enjoy making this and don'tforget to Tag me onInstagram and Twitterwith your finished project and also like my Page in Facebook, Si Nanay Madel. I would love to see what you've done and Pin it also on Pinterest.
So that's it. I hope you all learn something and enjoy this post. If you have any questions, comments or suggestion just leave a message in the comment box and I will gladly answer them. Thank you and God bless!
xoxo
Nanay Madel
Don't forget to share on Facebook, Pinterest, Twitter and more.
**Please do not copy and post any pattern from this blog and claim it as your own. This pattern is limited to personal use only. Please do not re-publish all photos from this blog as your own. You may make and sell products from my pattern. Please also link back to my post. Any link back will be much, much appreciated. Thank you very much. **
I always make sure to share also because I learn to crochet for free from some very generous bloggers
Thought of the Day
August 22, 2017
To all who receive the Sabbath as a sign of Christ's creative and redeeming power, it will be a delight. - HLv 191
This one is very easy to do. I've trying to make crochet these days that are easy and quick to make. It's good for those beginners in crochet.
I am using cotton yarn just because I live in a very humid country. But you can actually use any kind of yarn for this. There are no specifications and it won't affect the sizing of your top because in making this top we are not depending on the stitch count or your gauge. We are going to take measurements on your body and begin there in making this top. So a Tape Measure is a must and also any type of yarn will do.
Materials:
Yarn ( Any Type, Any Color)
Tape Measure
For the type of yarn I used 5.00/H Crochet hook
Tapestry Needle
Scissors
Terms Used
ch(s) - chain (s)
st(s) - stitch(es)
sc - single crochet
hdc - half double crochet
dc - double crochet
sl st - slip stitch
Instructions First of all before starting to make this top make sure you have all your materials. Then take your body measurements. Please refer to the picture below on how to take your measurements. Just measure the FULLEST PART of your upper body (which is usually your chest circumference) then take also the LENGTH of your blouse, from the top of your shoulder down to your HIP 1 only. But if you want it longer or shorter you can do so.The red lines are the measurements you need to take.
Now that you have your measurements, let's use them in making your Laverne Top.
Measurement 1 (M1) - Chest Circumference PLUS 2 inch
Measurement 2 (M2) - Length from top shoulder to HIP 1
R1. Make 2 squares or sometimes it will be a rectangle depending upon your measurements. Start by making a foundation chain that is as long as your M1. Add 2 CHs then, then DC in the 3rd chain from the hook. DC in all stitches till the end. CH 2 and turn.
R2 until your it measures the same as M2. DC in the first stitch and in all the stitches till the end of the row. CH 2 and turn.
Fasten off and weave all ends.
Join your two squares together on each side. In joining you can either sew them or slip stitching them both or use single crochet in joining them. REMEMBER TO JOIN MIDWAY ONLY. DO NOT join until the end or you will not have any arm holes.
Join also your shoulders together on each side. In joining the shoulders I used Crab Stitch on this one. But you can use any stitch to join them together. Join only until about a quarter of the length of your M1 on each side.
Blouse Band in the Bottom
R1. Find the center of your Blouse at the back. Then attach your yarn, CH 1, SC in the first stitch and in all stitches around. Join with a sl st in first st.
R2- R10. CH 1, SC in the first stitch and in all stitches around. Join with a sl st in first st.
Fasten off and weave ends.
Armholes Finishing.
R1. Attach yarn at the bottom center of your armholes. CH1, HDC in the first stitch and in all the stitches around. (make 2 HDC in each side of a DC or Beg CH2). Join with a sl st in first ST.
R2. CH 2, SC in the 3rd loop of the HDC in the previous round or do a Camel Stitch. SC in all stitches around, remember to do it all in the 3rd loop of the HDC in the previous round. Join with a sl st in first ST.
R3-R4. CH 1, SC in the first stitch and in the stitches around. Join with a slip stitch in first ST.
Fasten off and weave all ends.
And that's it! That's how simple and easy this Blouse to make. You need not worry about the number of stitches or your gauge is maybe too tight or loose.
Hope you also enjoy making this and don'tforget to Tag me onInstagram and Twitterwith your finished project and also like my Page in Facebook, Si Nanay Madel. I would love to see what you've done and Pin it also on Pinterest.
So that's it. I hope you all learn something and enjoy this post. If you have any questions, comments or suggestion just leave a message in the comment box and I will gladly answer them. Thank you and God bless!
xoxo
Nanay Madel
Don't forget to share on Facebook, Pinterest, Twitter and more.
**Please do not copy and post any pattern from this blog and claim it as your own. This pattern is limited to personal use only. Please do not re-publish all photos from this blog as your own. You may make and sell products from my pattern. Please also link back to my post. Any link back will be much, much appreciated. Thank you very much. **
I always make sure to share also because I learn to crochet for free from some very generous bloggers
Thought of the Day
August 14, 2017
The government of self is the best government in the world. - AG 39