Thursday, June 30, 2016

5 Beautiful Crochet Curtains- Free Pattern


Been dying to make a crochet curtain, but I haven't started yet. Here are some of my favorites around the web. This are beautiful curtains and also all patterns are free as of writing.

  1. Colorful curtain  by Ioana van Deurzen - It's pretty.  This is good for your kitchen or dining area. Actualll almost all of the curtains of this post are good for your kitchen or dining area.
  2.  Flower Power Valance by Once Upon A Pink Moon. This is so popular and I could not wonder why. It is so beautiful and the colors are vibrant. Good for the kitchen also.
  3. Big Bold Chevron Curtain  by  Moogly. Tamara is one of my favorite crocheter. I love her blog and I love her works. This curtain is so easy to make and can be actually used anywhere in you home.
  4. Bernat Blocks-In-Blocks Curtains by Yarnspirations. This is nice and delicate. Wish I have so many time in my hand that I can make more of this.
  5. Daisy Valance Design by Diane Stone for  Crochet Magazine. This could look so nice even if your kitchen is painted white. I love white kitchen plus white curtains.

    There are actually so many beautiful patterns around the web. And so many of them are for free. There are so many generous designers, they are one of the reasons why I share what I do here in my blog. I am inspired by those who share their beautiful creation for free. All pictures used here in this post is not mine. I do not own them. Click all the links to visit each blogger/contributor.

    So I hope you all enjoy this post and learn something. 


    xoxo

    Nanay Madel 


    Don't forget to share on facebook, pinterest , twitter and more... Please bear with my pictures, I just took them using my phone. Thanks!  

    **Please do not copy and post this pattern and claim it as your own. Please do not re-publish all photos from this blog as your own. You may make and sell products from my pattern. Please also link back to my post. Any link back will be much, much appreciated.Thank you very much. **
    I always make sure to share also because I learn crochet for free and I got all of my patterns from all over the internet from some very generous bloggers. So please also click the links and support the bloggers.


Monday, June 27, 2016

Gadget Purse Set


This is a combination of a Purse for your Ipad or Tablet and a cellphone pouch. I thought of making a real purse but the purse turn out to be smaller and slimmer so I guess only an Ipad or Tablet will be able to fit in here. I used a special stitch on this project I really don't know what to call that stitches. I kept on searching this on the internet. I found out from Interunet.com about this and she calls it Wildflower stitches. But when I search it on the web about wildflower crochet stitches, this stitch will not come out. So if you know what really is the name of this stitch then comment below so that I can properly name this stitch also.

Materials:
  • Lily Sugar and Cream Kitchen Breeze
  • H hook/ 5 mm
  • G hook /4mm
  • Tapestry needle for weaving ends
  • Scissors
  • Buttons
  • Cloth for lining

IPAD PURSE:

Chain 80 plus 1 or multiples of 2 plus 1. Slip stitch on the first stitch to join.
R1. Chain 1, Half Double Crochet (HDC) all the way around and slip stitch on top of the first HDC.
R2. Yarn over, insert hook on the first stitch , pull up a loop (you'll have 3 loops on your hook) insert hook unto the next stitch and pull up a loop again (4 loops on hook).Insert hook unto the next  stitch again then pull up a loop (5 loops on hook) then yarn over and pull  through all loops. *Chain 1. Yarn over, insert hook on the same stitch you last worked on, pull up a loop (you'll have 3 loops on your hook) insert hook unto the next stitch and pull up a loop again (4 loops on hook).Insert hook unto the next  stitch again then pull up a loop (5 loops on hook) then yarn over and pull  through all loops* Repeat this until the end. Ending with Chain 1. Slip stitch on the first Chain 1.
R3. *HDC 2 in Chain 1 space from the previous round(do not chain 1 first HDC 2 directly). * Repeat this to end.  This will create a flower like stitch.

If you don't understand what I am trying to say here. Watch this video from Interunet. This is how it is done. 
 
R4-R15. Repeat R2 and R3. If you want to continue or you cant to make a bigger purse you can continue doing this ending with R3. 
R16. Chain 1. SC in first stitch. SC all the way around. Turn.
R17- R18. Repeat R16.
R19.  Chain 1, Skip the first stitch and SC all the way around. Turn. (This will decrease the stitches)
R20. Chain 1 SC in first stitch and SC all the way around. Turn.
R21-30. Repeat R19 and 20. 
R31.  Chain 1, Skip the first stitch and SC 11, chain 5 and skip 5 stitches (this will be your buttonhole).  SC till the end. Turn  

R33.   Chain 1, Skip the first stitch and SC all the way around. When you reach to the Chain 5, SC 5 also in chain 5. Turn.
R32. Chain 1 SC in  first stitch and SC all the way around. Do not turn. Continue to SC all way down to the edges until you come back to the first stitch of R32. Slip stitch in Chain 1 and fasten off. Weave all ends. 
For the bottom part. You can either sew it together or you can closed it with single crochet. SC the the back and the front together.

Cellphone Pouch 

Grab your G hook

R1. Chain 13. 2 SC  in second chain from the hook. SC 8, 5 SC in last chain. Continue to SC on the other side of the Chain13. SC in next stitch and to the next 7 SC. 3 SC in last stitch where the first 2SC is. Slip stitch in first SC. You will have a total of 30 SC all the way around.
R2. Chain 1, Half Double Crochet (HDC) all the way around and slip stitch on top of the first HDC.
R3. Yarn over, insert hook on the first stitch , pull up a loop (you'll have 3 loops on your hook) insert hook unto the next stitch and pull up a loop again (4 loops on hook).Insert hook unto the next  stitch again then pull up a loop (5 loops on hook) then yarn over and pull  through all loops. *Chain 1. Yarn over, insert hook on the same stitch you last worked on, pull up a loop (you'll have 3 loops on your hook) insert hook unto the next stitch and pull up a loop again (4 loops on hook).Insert hook unto the next  stitch again then pull up a loop (5 loops on hook) then yarn over and pull  through all loops* Repeat this until the end. Ending with Chain 1. Slip stitch on the first Chain 1.
R4. *HDC 2 in Chain 1 space from the previous round(do not chain 1 first HDC 2 directly). * Repeat this to end.  This will create a flower like stitch.
R5-15. Repeat R2 and R3.
R16. SC 12. Chain 16 (Loop for button). SC in same stitch and SC all the way around. Slip stitch in first stitch. Fasten off and weave all ends.
Attached all buttons and you are done. You can line the Tablet Purse if you want. I did line my tablet purse but not the cellphone pouch. Here's another look on a different background.


So that's it. I hope you enjoy this post. If you have any questions or suggestions kindly leave a comment below. I'll be glad to answer them. Thank you very much.


xoxo

Nanay Madel


Don't forget to share on facebook, pinterest , twitter and more... Please bear with my pictures, I just took them using my phone. Thanks!  

**Please do not copy and post this pattern and claim it as your own. Please do not re-publish all photos from this blog as your own. You may make and sell products from my pattern. Please also link back to my post. Any link back will be much, much appreciated.Thank you very much. **
I always make sure to share also because I learn crochet for free and I got all of my patterns from all over the internet from some very generous bloggers. So please also click the links and support the bloggers.

Saturday, June 25, 2016

Crochet head band


 When I  was making my version of Moogly's Amelia Shawl I used two skeins of RH Boutique Unforgettable Sunrise. But I did not used it all up. So I thought of making something out of the remaining yarn. And so is the birth of my new pattern. The Headband Crochet.

Materials:
  • Red Heart Boutique Unforgettable  Sunrise
  • G, H, I hook
  • Tapestry Needle
  • Scissors
Band
 
With G hook Chain 11.
R1. DC on the 4th chain from the hook. DC on each of the next 7 stitches. 8 DC's all in all plus the starting chain 3. Chain 3 and turn.
R2. DC on each of the next 7 stitches.
Repeat R2 until you reached the desired length of your headband.
Break the yarn and take your Tapestry Needle and stitch the two ends of your band together.

Flower
 H hook.
R1. Magic Ring. *Chain 3 and Slip stitch into the Magic Ring.* Repeat 5 more time. You will have 6 Chain 3 Loops on the ring. Closed up the ring.
R2. Slip stitch on the first chain 3 loop and Chain 1, HDC, DC, HDC Chain 1 and slip stitch into the loop. Do this on
all the chain 3 loops.
Change to I hook for a bigger petals below.
R3. Slip stitch on the back of the DC of the petals. Chain 4 and slip stitch again on to the back of the DC of the next petal. Do all this until you reached the last petal.
R4. Slip stitch on the first chain 4 loop and chain 1, HDC 3 DC, HDC, chain 1 and slip stitch in the loop. Do this on all the remaining Chain 4 loops. Then slip stitch to the first stitch and fasten off.
 Attached your flower to the band you made and Whalah!!! its all done! That's how easy it is.


So that's it. I hope you enjoy this post. If you have any questions or suggestions kindly leave a comment below. I'll be glad to answer them. Thank you very much.


xoxo

Nanay Madel


Don't forget to share on facebook, pinterest , twitter and more... Please bear with my pictures, I just took them using my phone. Thanks!  

**Please do not copy and post this pattern and claim it as your own. Please do not re-publish all photos from this blog as your own. You may make and sell products from my pattern. Please also link back to my post. Any link back will be much, much appreciated.Thank you very much. **
I always make sure to share also because I learn crochet for free and I got all of my patterns from all over the internet from some very generous bloggers. So please also click the links and support the bloggers.

ps.

*I am not professional blogger nor is English my language so I apologize if I misspelled some words or my grammar is not right.*


Shell Stitch Crochet Skirt


When I first go back to crocheting one of my first project was a crocheted skirt. But I never got to finished it. I made it with Crochet thread and that is why it took so long to make it, and I grew weary and did not finish it at all.  So here I am now after more than a year of full crocheting I am able to make my first crocheted skirt. It is made with worsted yarn.

Materials:
  • 4 color yarn (Deborah Norville Collection Everyday Soft Worsted )
           COLOR A - BLACK           
           COLOR B -  RED
           COLOR C - BROWN
           COLOR D - CREAM
  • I hook /5.5mm
  • G hook / 4.0mm
  • Tapestry needle for weaving in ends
  • Scissors

Stitches Used:
  • st(s)  - stitch(es)
  • ch - chain
  • sc - single crochet
  • dc - double crochet
  • sl st - slip stitch


Directions:

Grab your H hook and let's begin with COLOR A. Chain 152 or Multiples of 10 plus 1. Join with a slip stitch to the first chain.

 R1.  Chain 1, SC all the way around and join with a slip stitch in first stitch.

 R2.  Chain 1, Sc in first stitch, *skip 2 stitch then DC 5 times in next stitch. Skip 2 stitch, SC in next stitch (shell stitch made).* Repeat all the way around ending with  DC 5 times in the SC from the previous round  and skip 2 stitch and slip stitch on top of the first SC of the round. Change to COLOR B.

 R3. Chain 3, DC 2 in first stitch, then SC on the center of the 5DC of the previous round (or the 3rd DC of the shell). *Then skip 2 stitch and make 5 DC on  the SC from the previous round. Then skip 2 stitch, SC on top of the  shell stitch.* Repeat till end. Ending with  1 SC on top of a shell stitch, skip 2 stitch (the last 2 stitch of the round), 2 DC on  the FIRST stitch of the round, (the same stitch with the 3 chain and 2 DC)and slip stitch on top of the 3 chain.  Change to COLOR C

 R4. Chain 1. SC in same stitch or on top of chain 3 from previous round.  Skip 2 stitch and 5DC on top of the SC from previous round.  * Skip 2 stitch, SC on top of the shell stitch, skip 2 stitch again and 5 DC on the SC from the previous round. * Repeat till end. Ending again in DC 5 times on SC from the previous round and skip 2 stitch and slip stitch on top of the first SC of the round. Change to COLOR D.

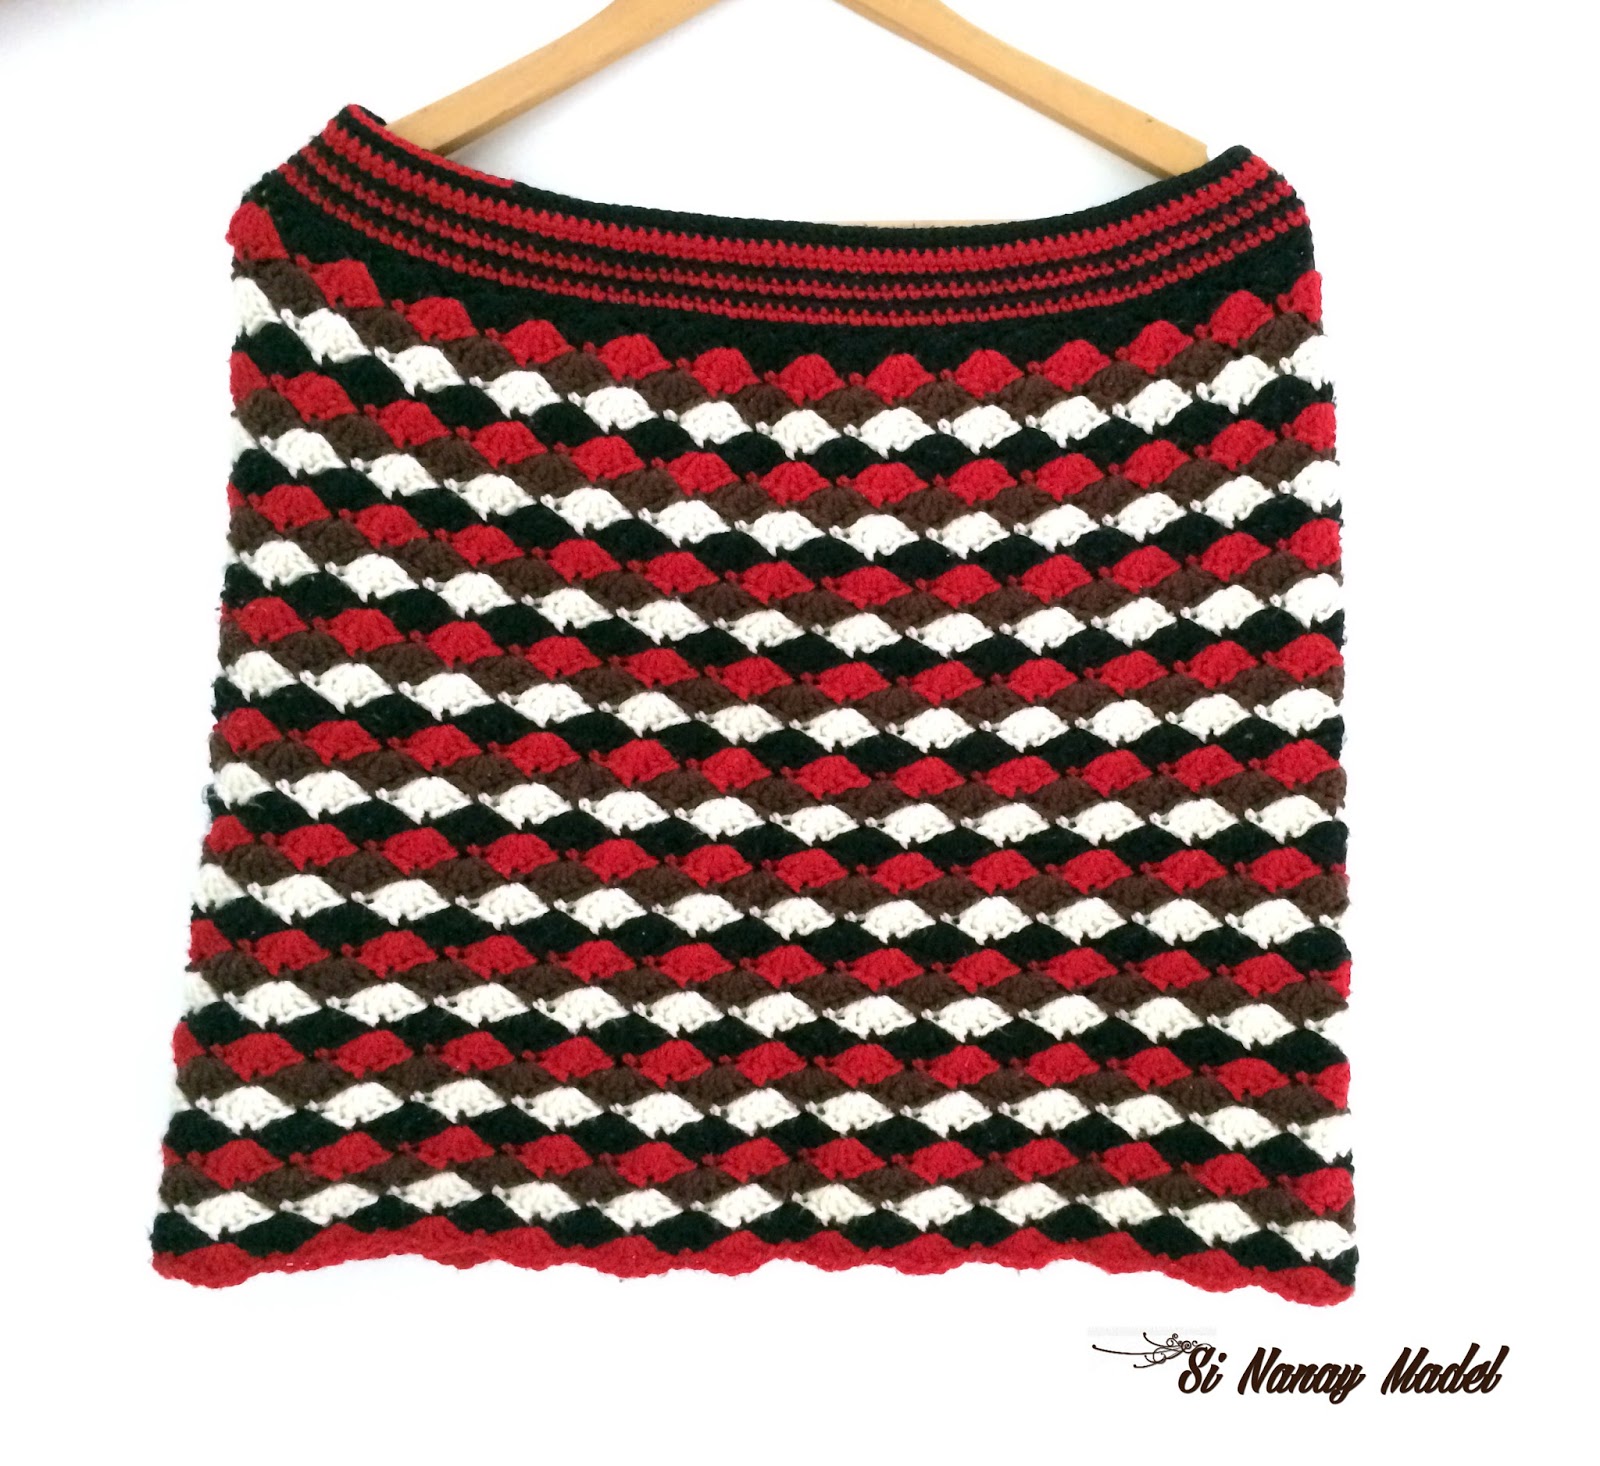
Repeat R2 to R4 until you will reach the desired length of your skirt. Alternating color in every round. I end my skirt with Color B or RED.

 Here is a closed up look on the stitches after it is all done.


After all the shell stitches. Weave all ends and lets go back to the foundation chains. Let's make now the waistband of this skirt. We Will only use COLOR A & B or RED and BLACK.

WAISTBAND
Grab your G hook and let's begin.
R1. Attached COLOR B to the first chain of the foundation chain. This will be the back of our skirt, where we will button later. Chain 1, then SC all the way around. Slip stitch in first SC. Change to COLOR B.

R2.  Chain 1, then SC all the way around. Slip stitch in first SC. Change to COLOR A.
R3-R4 . Repeat R2 alternating Color A and B.

R5. With  color B. Chain 1, then SC all the way around. DO NOT SLIP STITCH. We will add a button hole . Chain more 6 chains then Turn. Change to COLOR A.

R6. SC in second chain from the hook. SC in next 5 chains. And continue SC in each of the stitch around. Chain 1 and turn. Change to COLOR B.

R7  With  color B. Chain 1, then SC in first 2 stitches. then Chain 5 and skip 5 stitches. SC in next stitch and SC  all the way around. Chain 1 and turn. Change to COLOR A.

R8 - R 10 Repeat R2 alternating COLOR A and B. Chain 1 and turn.

R11. With COLOR  A. Slip stitch all the way around. Break yarn and weave all ends.

Attached your Button adjacent to your Button hole.  Line your skirt if you want. I did not line mine.

When I took pictures of this skirt my youngest would not let me go. So he is included in the pictures here. The struggles is so real when you have a 3 year old son. :) but it was all fun.


So that's it. I hope you all learn something and enjoy this post. If you have any questions, comments or suggestion just leave a message on the comment box and I will gladly answer them. Thank you and God bless!


xoxo

Nanay Madel


Don't forget to share on facebook, pinterest , twitter and more... Please bear with my pictures, I just took them using my phone. Thanks! 

**Please do not copy and post this pattern and claim it as your own. Please do not re-publish all photos from this blog as your own. You may make and sell products from my pattern. Please also link back to my post. Any link back will be much, much appreciated.Thank you very much. **
I always make sure to share also because I learn crochet for free and I got all of my patterns from all over the internet from some very generous bloggers. So please also click the links and support the bloggers.


Monday, June 13, 2016

Crochet Toddler Dress


I've been wanting to make a toddler dress. It was actually  crochet baby/toddler dress that made me decide to make crochet again. I never really thought before that crochet can create so many things. I only know to to make crocheted doily and I can barely make a hat in those days. Now here I am with the right yarn and patience I made my very first toddler dress.

I am so happy that I was able to make this because of my very cute pamangkin (niece). She models my work so effortlessly! She looks so cute in them. BUT! it's so hard to take pictures with her. She keeps on moving and running!!.

So here it is:

Materials:
  • Gantsilyo Guro Milk Cotton Light in two colors of your choice. Two skein each color.
  • I Hook or 5.5mm
  • G hook or 4.00 mm
  • 4 buttons
  • tapestry needle
  • cloth for lining ( optional)

With your I hook, chain  or multiples of  5. Join with a slip stitch  on the first chain.

R1. Chain 1. SC on the first chain, SC all the way. Join with a Slip Stitch.
R2. Chain 3. DC on the next 2 stitches. Chain 2, skip 2 stitches. * DC in the next 3 stitches, Chain 2, skip 2 stitches * Repeat all the way around then join with a slip stitch on top of the chain 3.
R3.  Chain 5 ( chain 3 plus chain 2 space). *3 DC on the Chain 2 space. Chain 2 then 3 DC on the chain 2 space* Repeat all the way around ending with just 2 DC on the Chain 2 space. Then Slip stitch on top of chain 3.
R4. Chain 3. 2DC on the chain 2 space. *Chain 2, 3 DC on the Chain 2 pace. Chain 2 * Repeat all the way around ending with a Chain 2 then slip stitch on top of chain 3.
R5- Up to what length you like  . Repeat R3 and R4. Changing color every 8 round. End your work with R4. Change to G hook.
RA. With the white yarn Chain 1. SC on the next 3 stitches. *1 SC on the chain 2 space, SC on the next 3 stitches* Repeat all the way around.
RB. Chain 1 SC all the way around. Join with a slip stitch on the first stitch.
RC. Chain 1 SC all the way . DO NOT JOIN.  Chain 10 more plus Chain 1 and turn.
RD. SC on the 2nd chain from the hook. then SC  all the way up to the chain 10 plus. Chain 1 and turn.
RE. SC all the way . Chain 1 and turn.
Repeat RE until you reach the length you desire. That length is from the armpit of the toddler to her waist. I did put some buttons at the back.

Button holes( Do this 5 rounds of SC after the Chain 10 plus. Then every 10 rounds of SC after the first button hole)
When making the button holes. When you reach to the end of the Chain 10 plus. Chain 1 turn then SC 5 and chain 5, skip 5 then continue to SC all the way around.

The straps. Make 2 with just 8 stitches in between in the front.
Locate the most center stitch then count 4 stitches to the left and attached your yarn.
R1. SC 8. Chain 1 and turn
R2.  SC all the way. Chain 1 and turn. Repeat this until you have your desired length.

On the 2nd Strap.
From the most center stitch. Count 12 stitches to the right. Then attached your yarn. And Repeat R1 & R2 of the first strap.

Attached the Straps at the back using your tapestry needle. Count 8 stitches away from the end, then sew your strap. Do this on both side  at the back.

Attached the buttons adjacent to your button holes.

Line the skirt part.  


So that's it. I hope you enjoy this post. If you have any questions or suggestions kindly leave a comment below. I'll be glad to answer them. Thank you very much.


xoxo

Nanay Madel


Don't forget to share on facebook, pinterest , twitter and more... Please bear with my pictures, I just took them using my phone. Thanks!  

**Please do not copy and post this pattern and claim it as your own. Please do not re-publish all photos from this blog as your own. You may make and sell products from my pattern. Please also link back to my post. Any link back will be much, much appreciated.Thank you very much. **
I always make sure to share also because I learn crochet for free and I got all of my patterns from all over the internet from some very generous bloggers. So please also click the links and support the bloggers.

ps.

*I am not professional blogger nor is English my language so I apologize if I misspelled some words or my grammar is not right.*


Saturday, June 11, 2016

African Daisy Crochet Handbag


As promised, here is my tutorial for African Daisy Crochet Handbag. Sorry if it took me another week to post this tutorial. I am more busy in doing crochet than making blog post about what I am making. But here is it now. If you haven't seen my post on how to make African Daisy Crochet you should check it out first before proceeding to make the bag, because I will not talk about how to make the African Daisies here. This post is more on how to assemble the daisies and to turn it into a handbag. But, if you already knew how to make them then let's get started.

Materials:
  • Red Heart Creme de la creme in 5 colors
  • H hook or 5mm
  • Wooden Handle 
  • Tapestry needle
  • some cloth for lining
  • zipper
1. Make 18 African Daisies and arrange them together like the one in the picture below.
Step 2. With your green yarn join the hexagons with a single crochet. Join it vertically. Follow the blue arrows.
Step 3. Join it this time horizontally. Since the daisies are hexagons, you'll have to join them individually, not a continuous joining. Follow the red arrows in the picture below

 Step 4. Then fold your joined hexagons with number 10 an 12 on the bottom. After you fold them the hexagons will be aligned with each other and you will know by just looking at it where to join next to finish off all the joining. Same principle, join first vertically then horizontally. Because with it you can join the hexagons continuously on vertical rather than starting horizontal then there will be no continuous joining.  Then weave all ends after all the joining.

Step 5.  We will now going to attached the wooden handle on our bag. Grab your Red and Jade yarn and let's make something that will hold the yarn.

  • R1. Find the inside corner of hexagon number 3 or 18. You can start on any of the two. The one encircled in red. In that corner you can find the DC, chain 1 DC stitches. Now grab your H hook then start a Front Post Double Crochet Decrease on the first 2 stitches from the chain 1 stitch. Then FPDC on the next 6 stitches. When you reach again the corner, make a FPDCDecrease on the next 3 stitches, being the first leg of the decrease on the first hexagon (3), then the second leg on the JOINING and the third leg on the next hexagon (2). Then FPDC on the next 8 stitches. Then FPDCDecrease on the next 3stitches, do the same that you did on the last corner that you encountered. The FDC on the next 6 stitches and FPDCDecrese on the last 2 stitches of hexagon  1. Chain 1 then turn,
  • R2. SC all the way, when you reach the the FPDCDecrease stitches make also a SC decrease on 2 stitches, then sc all the way. Chain 1 and turn.
  • R3. SC all the way with no decreases. Chain 1, turn.
  • R4-R8 - repeat R3.
  • R9 - SC on 6 stitches, 3 SC on the next stitch, SC on the next 6 stitches,  3 SC on the next stitch, SC on the next 6 stitches. Chain 1, turn.
  • R10. SC on each stitches all the way. Chain 1, turn.
  • R11.  SC on the next 7 stitches, 2 SC on the next stitch, SC on the next 7 stitches, 2 SC on the next stitch, SC on the next 7 stitches. Chain 1, Turn.
  • R12-R13 SC all the way. Leave a long tail for sewing on. 
  • Do all of this on the other side of the bag.

Step 6. Get your wooden handles then attached them to your bag using what we just created to wrap the handles then sew it on  the wrong side or the inside of the bag, using the long tail. Then weave all ends.

Step 7. Line your bag and attached a zipper.

And that's it. Your bag is done. You can block your bag if you want. Block it first before joining all the hexagons.
So that's it. I hope you all enjoy this post and learn something. If you have any questions or suggestion just comment below and I am glad to answer all of them.


xoxo

Nanay Madel


Don't forget to share on facebook, pinterest , twitter and more... Please bear with my pictures, I just took them using my phone. Thanks!  

**Please do not copy and post this pattern and claim it as your own. Please do not re-publish all photos from this blog as your own. You may make and sell products from my pattern. Please also link back to my post. Any link back will be much, much appreciated.Thank you very much. **
I always make sure to share also because I learn crochet for free and I got all of my patterns from all over the internet from some very generous bloggers. So please also click the links and support the bloggers.

ps.

*I am not professional blogger nor is English my language so I apologize if I misspelled some words or my grammar is not right.*


Saturday, June 4, 2016

African Daisy Crochet Tutorial


This is my African Daisy Crochet handbag. I've been trying to post some tutorial of African Daisy for quite some time already. I really like it. It is so pretty and it is also so easy to make. Although there are so many tutorials around the web, I wanna make my own for all of you. So after a long time, I was able to take pictures while crocheting. So, here it is my own version of African Daisy:

Materials:
Yarns ( dark blue, blue and pastel blue)
 For this tutorial, we will use a G hook ( 4mm)


Step 1.  Make a Magic Ring


Step 2.  Chainless Starting DC in Magic Ring  This link has a good tutorial on how to do the chainless starting DC in Magic Ring.


Step 3.  Double Crochet (DC), then chain 1 in the Magic Ring

Step 4. Make 2 DC and chain 1.
Step 5. Repeat this 5 times. You'll end up with 6  pairs of Dc and 6 chains also.


Step 6. Close the ring tightly. And join with a slip stitch on the first stitch. Then break yarn.


Step 7.  Change to the next color of yarn. In this tutorial, it is Pastel Blue. Then make a Standing Double Crochet in any of the chain one space. With my standing DC, I start it with a slip stitch or if you want you can skip the slip stitch and wrap your yarn on your hook 3 times then start the standing DC like this one from Mooglyblog.

Step 8.  Then DC, chain 1 and 2 DC in the same chain 1 space.

,
 Step 9. 2 DC, Chain 1, 2 DC in all of the chain 1 spaces all around. Then join with a slip stitch in the first chain. DO NOT BREAK THE YARN. We will continue with the same color of yarn. In this photo you can start to see that it is starting to shape like a hexagon. The African Daisy Crochet is usually in Hexagon.

Step 10. Slip Stitch in the next two chains and you will end up in the first Chain 1 space.


Step 12. Then make 6 DC in the same chain 1 space.


Step 13. Make 7 Dc on each of the chain 1 space around. Then join with a slip stitch on the first stitch. Break the yarn. Now you can see that it is a flower already.

Step 14. Change to another color of yarn. In this tutorial it is blue. Then make a slip stitch and insert your hook to the slip stitch. We are going to make a Standing Spike DC . After the slip stitch like the one you see below, wrap your yarn to the hook one time like a Yarn Over (YO). 

Step 14.Then insert your hook in between the group of 2 DC chain1 2 DC in step 9. NOT THE CHAIN 1 Space. Then Make a DC. That's how it looks like.   Excuse my ends because I usually weave all ends in the end. :)

Step15. Then SC on the next 7 stitch. 


Step 16. Then Spike DC, SC in the next 7 stitch all the way around. Then join with a slip stitch on the first stitch. You can break your yarn if you want to and change to another color, but for me, I'd like to continue with the same color of yarn. That is why I only have 3 colors of yarn.

Step 17.  Standing  DC, DC on to the next 3 stitches.

Step 18. Then Chain 1, DC into the same stitch.


Step 19. DC into the next 8 stitches.
Step 20. Repeat step 18 and 19 all the way around.

Step 21. Then join with a slip stitch and break your yarn. And weave all ends. And that's it!
That's how easy it is. If you have some questions or clarifications, just leave a comment below and I will gladly answer your questions.

With regards to my handbag, I will post another tutorial about it on how to assemble all this daisy's and turn it into that beautiful handbag.

I hope you do enjoy this post and learn something. Thank you and God bless!

xoxo

Nanay Madel 


Don't forget to share on facebook, Pinterest , twitter and more... Please bear with my pictures, I just took them using my phone. Thanks!  

**Please do not copy and post this pattern and claim it as your own. Please do not re-publish all photos from this blog as your own. You may make and sell products from my pattern. Please also link back to my post. Any link back will be much, much appreciated.Thank you very much. **
I always make sure to share also because I learn to crochet for free and I got all of my patterns from all over the internet from some very generous bloggers. So please also click the links and support the bloggers.

ps.

*I am not professional blogger nor is English my language so I apologize if I misspelled some words or my grammar is not right.*


Wednesday, June 1, 2016

C2C Blue PANDA Blanket


       C2C (Corner to Corner) Crochet is my new thing. Actually I have so many "things" in my hand, but I've been making more of this lately. And I love how I can create anything with C2C. You can actually make any design you want with it. This Panda Blanket has been on my hook for quite some time, but at last it was finished. My kids were anticipating for this to be done. And now it is done. It is quite big. It can accommodate to kids, maybe that is the reason also why it gotten so long to finish. The pattern actually is not that big, but I added more to it because I want it to be bigger, but it did got A LOT bigger than I thought.

Here are the materials I used:

  • Gantsilyo Guru's Light Milk Cotton Yarn in  Blue, Cream, Pastel Blue. If you want to put that rainbow border on the sides it is in Red, Tangerine, Sunshine, Spring Green, Blue and Lilac. I don't remember how many I've used up, but it's quite a lot because of the size of my blanket. I love this yarn because it is so soft and does not pile a lot. Good for blankets and things to be worn, also for amigurumi.
  • 4.00mm or G hook
  • Pand Pixel Pattern
I got this pattern from www. kandipattern.com. There are so many patterns that you can choose from in there. Just look for Perler Patterns because those are the ones that is good fro C2C projects. 

Below are some other angle of the blanket I made.


So I hope you enjoy this post and happy crocheting!


xoxo

Nanay Madel

Don't forget to share on facebook, pinterest , twitter and more... Please bear with my pictures, I just took them using my phone. Thanks!  


**Please do not copy and post this pattern and claim it as your own. Please do not re-publish all photos from this blog as your own. You may make and sell products from my pattern. Please also link back to my post. Any link back will be much, much appreciated.Thank you very much. **

I always make sure to share also because I learn crochet for free and I got all of my patterns form all over the internet from some very generous bloggers. So please also click the links and support the bloggers.

ps.

*I am not professional blogger nor is English my language so I apologize if I misspelled some words or my grammar is not right.*